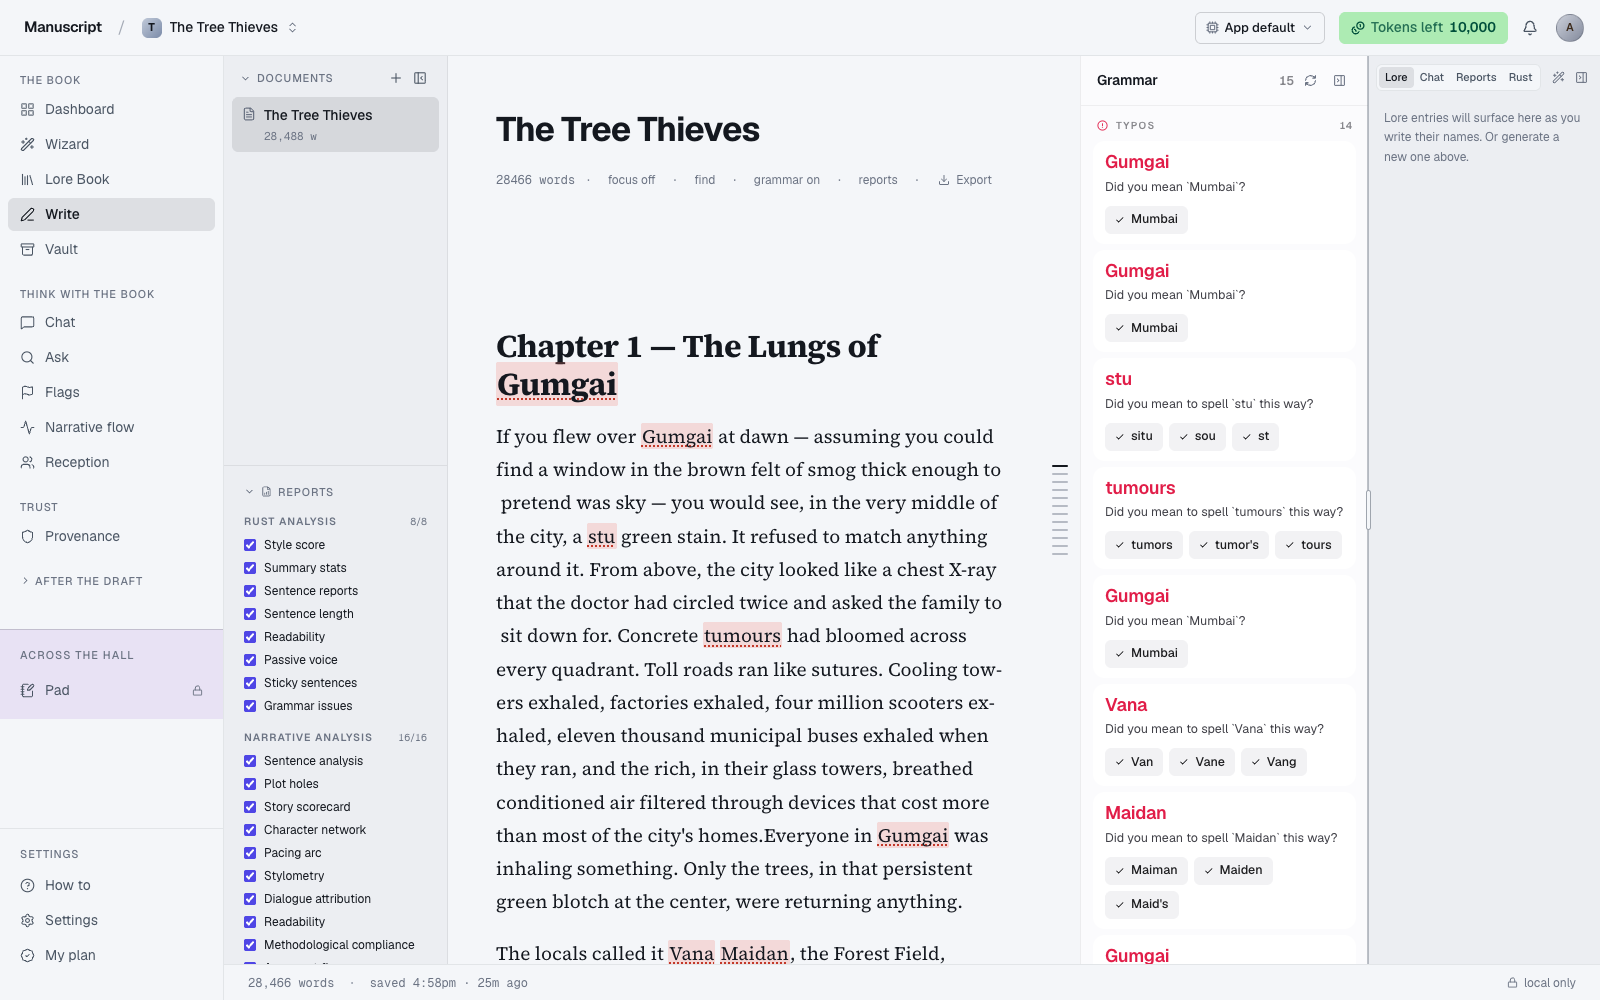
The editor
Write is where your manuscript actually lives. It's a serif editor built for long-form prose — Source Serif 4 at 19px, line-height 1.75, max width 68 characters per line. The measure is deliberate: your paragraphs read the way they'll read in print, so you can trust what you see. Nothing on this page tries to look like a productivity app; the prose is the object.
When you land on /write, the surface splits into three panes. On the left is a document sidebar showing every document in your current project (chapters, scenes, standalone notes) plus a Reports accordion pinned to the bottom. In the middle is the editor pane itself — the serif surface where the writing happens. On the right is the Lore Rail, a narrow 300–400px column with tabs for Lore Book entries, chapter reports, and a book-aware chat drawer. On desktop the layout stays three-column; on tablet the Lore Rail collapses to a 36px stripe you click to expand; on mobile the left sidebar becomes a slide-in drawer opened from a Documents button in the top toolbar.
The chrome around the editor (sidebar, buttons, toolbars, menus) stays in the sans-serif UI face (Geist Sans). When you're looking at your own words on screen, the line between prose and interface is visible — you can tell at a glance where writing ends and controls begin. That distinction was one of the strongest requests from the design review, and it's held up as one of the reasons the editor feels calm to sit in for hours.
Chapters, scenes, and paragraphs
Structure is heading-driven. You don't get a "new chapter" or "new scene" button; you get typography and rules:
- H1 — chapter title. Renders large and bold at the top of a new chapter.
- H2 — scene title (optional). Use if your book divides chapters into scenes.
- Body paragraphs — everything else. This is your prose.
Between scenes you can insert a chapter break (from the FloatingMenu, described below), which renders as a tracked-out * * * ornament centered on the page. It looks the way a print-set novel looks, because the export pipeline literally uses that character sequence.
Every paragraph gets a stable, unique ULID assigned under the hood on creation and preserved across every edit. That's how Provenance tracks which paragraphs changed, and how Ask can point you to a specific paragraph inside a specific chapter when you search a phrase. The IDs are invisible in normal use — you never see or type one — but they're the reason the app's audit and search features work at all.
Autosave and offline
The editor autosaves 1.2 seconds after your last keystroke. The debounce is chosen to match natural typing rhythms — you don't get an autosave every keystroke (network chatter), and you don't have to wait 30 seconds either (loss risk on tab crash). The footer bar shows the last save time — "saved 9:14am" — with a small clock icon, and to the right, a "local only" chip that flips to "synced" when the cloud mirror has caught up. Sync runs roughly every 30 seconds in the background. See How your data works for the sync architecture.
If your connection drops, the editor keeps saving locally to SQLite. Nothing about writing depends on network — the Harper grammar checker also runs locally, autosave writes to your own machine first, and the AI features simply queue their errors until the network is back. When you reconnect, the queued changes flush to the cloud mirror silently. You don't lose work, and you don't get a wall of "sync failed" toasts.
On mobile, the same save clock lives in a compact top toolbar next to the Documents drawer button, so you can see save status without scrolling to the footer. The status text is quiet ("Saving…" / "Saved" / "Edits autosave") and doesn't compete with your writing.
Focus paragraph mode
Press ⌘. (Command + period on Mac; Ctrl + period on Windows/Linux) or click the focus on button in the editor footer to enter focus mode. Every paragraph except the one your cursor is in fades to faint gray, so the paragraph you're working on has the whole visual field. It's the iA Writer approach — everything you're not currently writing steps back so the current paragraph can breathe.
Focus mode is per-tab, not persistent — closing the browser and reopening starts you unfocused. But the toggle itself is instant, and cheap; a lot of authors flip it on for revision passes and off for drafting. Press ⌘. again to leave. If you have "reduce motion" enabled at the OS level, the fade is instant rather than animated, matching your accessibility preference.
Grammar and style checks
Toggle the SpellCheck icon in the footer (or the same icon in the mobile top toolbar) to turn on real-time checks. Suggestions appear as ochre dotted underlines under the offending words — deliberately not the aggressive red squiggle of a word processor. The design choice was intentional: the goal is to inform, not scold. Red squiggles are what your seventh-grade teacher used.
The checker is Harper.js, an open-source grammar/style linter running in WebAssembly directly in your browser. Nothing is sent to a cloud service — the check happens locally in your tab. That's a hard rule; if you don't turn grammar on, no linting code even downloads (the WASM is lazy-imported when you toggle the button). The check re-runs 800ms after each edit, walks each paragraph, and hashes its text so unchanged paragraphs skip re-lint.
Hover any underlined word to see the message and the top suggestion in a small native tooltip. On mobile, a count badge appears next to the SpellCheck icon showing total issues; tapping the icon opens a diagnostics drawer with the full list. Applying a fix is a click. The kinds are color-coded — typo and grammar issues in red-orange, repetition and style in ochre — but the styling stays subtle so a document with a lot of decorations still looks like prose, not a warning screen.
The BubbleMenu — inline AI commands
Select any span of text — a phrase, a sentence, a paragraph, a scene — and a small menu appears above the selection with the inline AI commands under a Wand icon. Click the wand and pick from 12 commands:
- AI Edit — line-level edits without changing voice
- Rewrite — a tighter, sharper take on the passage
- Paraphrase — same meaning, different wording
- Content Improver — smooths flow while preserving your ideas
- Improve Structure — reorganizes for clarity without changing meaning
- Expand Content — writes more in the direction the passage was already going
- Complete Text — a two-to-three-sentence sketch that finishes what you started
- Change Perspective — first-person to third, present to past, and so on
- Voice Update — rewrites the selection in your voice fingerprint
- Summary — a short summary of the selection
- Translate — translates into another language you pick
- Real-time Errors — scans the selection for issues; never rewrites, only reports
Below those 12 you also see your My prompts section (see Your account for how to save custom prompts) — any reusable AI instructions you've defined show up here as extra commands.
Every command opens the suggestion sheet on the right side of the screen, sliding in with a subtle motion. Tokens stream in as they're generated — you see a blinking caret while the AI is writing, and the sheet's height grows with the content. For a paragraph, expect 5–15 seconds; for a whole scene, 20–60. You can dismiss the sheet mid-stream if you decide you don't want it after all, which cancels the underlying request.
When the stream finishes, three buttons appear at the bottom of the sheet:
- Accept — the suggestion replaces your selection. The document ID, paragraph IDs, before-text, and after-text are all logged to Provenance.
- Reject — the suggestion is discarded. Nothing changes in your manuscript.
- Regenerate — try again with the same command.
Nothing enters your manuscript unless you accept. That's the rule. The Wall lives inside the Pad but this half-wall — accept-before-write — is what keeps the editor honest. Every AI-written word you have in your final book is a word you clicked Accept on.
If your selection contains one or more @-mentions, the referenced Lore Book entries are pulled in as context automatically. The sheet header shows "+ 3 from lore" so you know what the AI is seeing when it writes. This is Codex auto-injection; see Overview, Lore Book, and Outline.
If you've generated a voice fingerprint and left it enabled, all 12 commands write in your voice profile — the AI reads your rhythm, vocabulary, distinctive habits, and things-to-avoid list before generating, and the output feels like something you might have written rather than generic AI prose.
The FloatingMenu — structural inserts
On an empty line, click the small + handle that appears to the left of the cursor, or type / to open the slash menu. This is where you insert structural elements: a new heading (H1 for a chapter, H2 for a scene), a chapter break (the * * * ornament), or a horizontal rule.
The slash menu is deliberately narrow. It's not a general command palette — it's for structure only. AI is on the BubbleMenu, not here. The separation is on purpose: the FloatingMenu is where you shape the book's skeleton, the BubbleMenu is where you shape the words. Mixing them in one menu was tried and rejected because it made the frequent case (add a chapter break) sit next to the rare case (translate) in the same list.
Multiple documents
Every scene you've linked to a document in the Outline, and every document you created directly here, shows up in the document switcher on the left sidebar of Write. The list is sorted by most-recently-updated, so the file you were just in stays at the top. Click a row to switch — TipTap unmounts the current editor state and remounts on the new document, which takes about 200ms.
The sidebar has hover-only ⋯ menus on each row with Rename and Delete. Rename updates the sidebar entry, the browser tab title, and every reference in your Outline. Delete opens a confirmation modal ("Delete <title>. This can't be undone.") and hard-deletes the document, its paragraphs, and their entries in the search index. Provenance for the document is retained.
You can collapse the whole sidebar with the panel-close icon in its header, which gives the editor + Reports panel the full page width. A thin 36px rail with a re-open button and the document count stays visible on the left edge so you always know the sidebar is there. On mobile, the sidebar starts closed and opens as a slide-in drawer when you tap Documents in the top toolbar.
Copy out and export
You can select and copy text from Write freely — this is your manuscript, and copying prose out to Slack, email, a comparison in another editor, or a print draft is all expected. The copy restriction lives on the Brainstorm Pad, not here. The Pad is exploration; Write is your book. Different rules.
For a full-manuscript export, use the Export button in the editor's meta row (top-right on desktop; in the mobile top toolbar). A menu drops down with six formats:
- DOCX — for Word, Pages, Google Docs, or Scrivener. The most portable option; agents and editors want this.
- PDF — print-ready with a fixed layout. Good for review copies you want to freeze.
- EPUB — for Apple Books or Send-to-Kindle. Reflowable, so it adapts to any reader.
- AZW3 — Kindle native format. Requires Calibre installed on the export server; if AZW3 is unavailable it silently falls back to EPUB, which Amazon accepts.
- Markdown — GitHub-flavoured
.md. Preserves headings and structure without formatting cruft. - Plain text —
.txt, no formatting. For when you need the raw prose.
The download starts in a new tab. AZW3 is the only format with a runtime dependency — if it fails, use EPUB and let Amazon convert on their end via Send-to-Kindle.
For a permanent off-platform backup of your book plus the AI-usage record, export the manuscript here and export the Provenance ledger. Two files, two seconds. Belt and braces. Do this before any major operation you're uncertain about — a delete, a mass find-and-replace, or a rewrite you're not sure you'll want to keep.
When something goes wrong
- Autosave stopped updating. A modal (suggestion sheet, mention picker, slash menu) may be open — close it. If not, refresh; the autosave binding almost always recovers, and your last saved state persists. See Troubleshooting.
- The AI suggestion is spinning. Cancel it (click outside the sheet or press Escape), wait a moment, and retry. Model providers occasionally have short outages that surface as slow or hung requests. See Troubleshooting.
@-mention isn't finding a character. The typeahead searches names and aliases. Add the alias in the Lore Book and try again — or use Create on the fly at the bottom of the picker to add a new entry without leaving the editor.- The Export button hangs on AZW3. AZW3 needs Calibre installed on the server. Use EPUB instead — Amazon accepts it via Send-to-Kindle, and any modern Kindle handles it natively.
- The suggestion sounds nothing like me. Generate a voice fingerprint and leave it enabled. Without a voice, the AI defaults to a competent-but-generic voice that will feel like the AI it is. With one, it reads your rhythm, vocabulary, and habits and matches them.
How to use it
- Click Write in the left sidebar. The editor page loads with three panes: a left document sidebar, the serif editor in the middle, and a right-side Lore rail. Pick a document from the sidebar's list, or open one from
/dashboard. The URL updates to/write?doc=<id>. - Start typing where the cursor lands. The editor is heading-driven: H1 for chapter titles, H2 for scene titles, everything else is body. Every 1.2 seconds after your last keystroke, autosave fires - the footer reads "saved 9:14am".
- To enter focus mode, press Cmd+. (Command + period) or click the focus on button in the footer. Every paragraph except the one your cursor is in fades to faint gray. Press Cmd+. again to leave.
- To insert structure on an empty line, type / to open the slash menu, or click the + handle to the left. Pick a heading, chapter break (renders as
* * *), or horizontal rule. - To reference a Lore Book entry, type @ and start typing a name or alias. The typeahead surfaces matching entries; pick one to insert a mention chip. Choose Create on the fly at the bottom to make a new lore entry without leaving the editor.
- To get an inline AI suggestion, select any span of text. A BubbleMenu appears above the selection. Click the Wand icon (Inline AI) to open the flyout, then pick a command - AI Edit, Rewrite, Paraphrase, Content Improver, Improve Structure, Expand Content, Complete Text, Change Perspective, Voice Update, Summary, Translate, or Real-time Errors.
- The suggestion sheet slides in from the right and streams tokens (5-15 seconds for a paragraph, with a blinking caret while the AI writes). The header shows "+ N from lore" if any mentions in your selection auto-injected lore entries. Click Accept to replace your selection (the before/after text is logged to Provenance), Reject to discard, or the regenerate button to try again.
- To turn on real-time grammar/style checks, click the SpellCheck (grammar) button in the editor footer. Harper.js loads in your browser (WASM, no cloud calls) and dotted ochre underlines appear on issues within 800ms of each edit. Hover any underlined word to see the message; click the underline to apply a suggestion.
- To export the manuscript, use the Export button in the meta row. Pick DOCX, PDF, EPUB, AZW3, Markdown, or Plain text. The download opens in a new tab.
What to read next
- Voice fingerprint — teach the AI to sound like you before you run any commands
- Provenance — where every accepted suggestion is recorded
- Overview, Lore Book, and Outline — the story graph that Codex injection pulls from