What the Wizard is
The Wizard is a ten-step interview that turns any idea — however messy — into a working manuscript. By the time you finish, you have a titled book with a defined genre and voice, a synopsis you can quote from memory, a populated Lore Book (characters, locations, and objects with structured fields), a chapter outline broken into scenes, and — if you asked for it — a paragraph-by-paragraph first draft that you either accepted, edited, or rejected in a suggestion sheet.
It's not a template generator. Every step reads the state you've built so far. Your Q1 idea dump seeds the Q2 title proposals; your Q4 synopsis seeds the Q5–7 lore; your lore seeds the Q8 outline; the outline seeds the Q9 scene beats; the beats seed the Q10 drafting. Each answer changes what the AI proposes for the next step, so how carefully you answer at the start compounds.
You can run the Wizard once for a whole book, or come back to it mid-project when a new act or subplot needs shape. Everything you type is saved automatically 1.2 seconds after your last keystroke — a "Saved just now" chip appears at the top of the step. When you close the tab and return, you land back on the step you left, with your last answer intact.
You can move backward at any point using the step counter at the top. Changing an earlier answer doesn't erase your later ones — it updates the seed the AI is working from. If you rewrite your synopsis in Q4, the chapters proposed in Q8 stay as they are; you'd have to re-run Q8 to get chapters based on the new synopsis. The Wizard is deliberately not "reactive" — cascading recomputes would burn tokens on drafts you might not want.
Steps 1 through 3 — set the frame
Q1 — Idea dump
The first screen is a large underlined textarea with a placeholder telling you to paste whatever you have. Paste anything: a one-sentence log line, ten pages of raw notes, a bulleted list, a voice-memo transcript, a napkin sketch typed out. The messier the better. The Wizard treats this as raw material, not as anything the reader will ever see.
Below the textarea are two primary buttons. Yes, I do → commits what you typed and advances. No, I don't — help me brainstorm opens a mini brainstorm chat where you can talk through a premise with the AI before returning to seed Q1. There's also a Skip for now link if you want to hop past this step (not recommended — the more you seed here, the better every later step becomes).
Nothing you paste in Q1 becomes prose in your manuscript unless you explicitly accept it later in Q10. Q1 is a private briefing to the AI; it's not published anywhere.
Q2 — Title
When you advance to Q2, the AI reads your Q1 dump and proposes several titles as tappable cards. Each card is a working title with a short reasoning line underneath ("plays on the water motif in your third paragraph", "evokes the quiet-menace tone").
You have three paths here. Tap a card to accept it as-is. Tap it once, then click the pencil icon to edit it inline. Or ignore the proposals entirely and type your own into the underlined text field above the cards. Whichever you pick is saved as the project title and appears in every page's header from that moment on.
You can change the title later without re-running the Wizard, from the project header dropdown at the top of any page.
Q3 — Genre and style
Q3 has two inputs. First, a genre picker: a scrollable list of genres (literary fiction, thriller, memoir, romance, historical, sci-fi, fantasy, and so on). Tap one; the border highlights indigo.
Second — and this is the load-bearing one — a style line: a single sentence describing the prose voice you want. Be specific. Vague style lines like "readable" or "engaging" produce vague drafts. Specific ones give the AI something to lean on. Some patterns that work well:
- "Spare, elliptical, present tense"
- "Warm, chatty, first-person memoir with dry humor"
- "Descriptive and slow, with long sentences and dependent clauses"
- "Journalistic — short paragraphs, active voice, no adjectives"
- "Nabokov-ish: layered, self-conscious, plenty of parentheticals"
The style line is quoted verbatim into the system prompt used by every subsequent AI proposal (chapter descriptions in Q8, scene beats in Q9, drafted paragraphs in Q10). If your voice changes as you write, come back to Q3 and rewrite it — the effect propagates to any step you re-run.
Step 4 — Synopsis
Q4 is where the Wizard first drafts real prose. Based on Q1–Q3, it generates a 200–400 word synopsis in the style you set at Q3. The synopsis streams in over 5–15 seconds; you can watch it write.
The synopsis is a full textarea below the AI's proposal. Everything the AI wrote is editable — rearrange paragraphs, delete sentences that don't feel right, add the plot beat it missed, tighten the ending. Spend 15 minutes here. This synopsis becomes the north star for every drafting step, and a good 15 minutes of editing here saves hours of Q10 rewrites later.
If you substantially rewrite the synopsis (change POV, add a new act, remove a character), consider going back to Q3 and refining the style line to match — the two work together, and Q3 is what makes the synopsis prose sound the way you want.
The final synopsis is saved to the project's Overview page and can be quoted from /overview at any time. It also seeds a Voice fingerprint job if you have voice profiling enabled.
Steps 5, 6, 7 — seed the Lore Book
Q5–Q7 populate your project's Lore Book with structured entries for characters, locations, and objects. Every entry created here is a real Lore Book node — you can edit them further, add aliases, generate portraits, and reference them via @-mention in the editor.
Q5 — Characters
The Wizard reads your synopsis and proposes a cast — usually three to eight characters, each on its own card. Each card shows the character's name, a proposed age, occupation, one distinctive trait, and one key wound.
For each card you have four options. Accept saves it as-is to the Lore Book. Edit opens the fields inline so you can rewrite the name, tweak the trait, sharpen the wound. Delete removes the proposal. Add another — a dashed empty card at the bottom of the list — lets you create a character the Wizard didn't propose.
Every card autosaves 700ms after your last edit and shows a small "Saved" chip at the bottom when it flushes.
Every character can have aliases — nicknames, code names, "the man in the hat," their real name if they use a fake one. Aliases are how Write's @-mention system resolves references. If you write "the Kingfisher" in your manuscript and that alias is on the character card, the mention still links to that entry.
Q6 — Locations
Same interaction pattern. The Wizard proposes locations that appear in your synopsis, each with a proposed region, vibe (one line), and one distinctive detail — a sound, a smell, a piece of architecture, the way the light falls. Accept, edit, delete, add.
Distinctive details are what make a location feel like a place and not a backdrop. Push the Wizard here — if the proposed detail is generic ("a bustling market"), edit it to something specific ("a market where every stall sells only two things, and the second thing is always a lie").
Q7 — Objects
Objects the story turns on: a locked drawer, a compass with a broken needle, a photograph the protagonist hides, a knife with initials that don't match. Anything symbolic, plot-critical, or repeatedly returned to.
Each object gets a name, a description, and a note field for its "symbolic weight" — what it represents beyond its physical form. If you're a Chekhov's-gun kind of writer, this is where you set up the payoff.
You don't need to complete every field on every entry. You don't need to accept every proposal. Only keep what actually matters to the story. Fewer, richer entries beat many hollow ones — the AI uses these as citations in Q10 drafting, and citations to sharp entries produce sharp prose.
Step 8 — Chapter outline
The Wizard reads your synopsis plus every Lore entry you accepted, and proposes a chapter list — typically 8 to 20 chapters. Each row shows a proposed chapter title, a one-line premise, and a rough act position (Act 1, 2, or 3, roughly following the classic three-act structure).
You can drag rows to reorder them (the drag handle appears on hover at the left of each row). Click a title to rename it. Click the premise to expand and edit the one-liner. Add row at the bottom inserts a blank chapter you can define yourself. The trash icon on each row deletes it.
If you already have a chapter outline of your own written up somewhere, the fastest thing is to delete the proposed rows and paste yours in. The Wizard doesn't need the outline to come from it — it just needs the outline to exist so Q9 has something to break down.
When you click Save & continue →, the outline is written into the project's Outline surface, where you can keep refining it after the Wizard finishes. This is where you'll spend the most time after the Wizard — the outline is a living document and evolves as you draft.
Step 9 — Scene planning
Step 9 opens a new URL: /wizard/chapters. The header shows "Chapter N of M" and a progress bar so you know how far you are through the outline.
For each chapter, the Wizard shows the chapter title and premise at the top, then a textarea below where you type scene beats — one per line. A beat is short: "Ada finds the letter", "Ada and Owen argue about the letter", "Ada burns the letter". You're describing the shape of the chapter, not writing it.
If you don't want to type beats yourself, click Plan it for me. The AI streams five plan options as cards — different arrangements and pacings for the same chapter. Pick one to prefill the textarea, then edit it. Or reject them all and type your own from scratch.
As soon as you approve a chapter's scenes, a document is seeded in Write. You don't have to wait for step 10 to see structure in your editor — chapters and scene headings appear the moment you save.
If you'd rather write the whole book yourself from the outline (which is a completely legitimate way to use the Wizard), you can stop here and go straight to the editor. The Lore Book and Outline are populated, the chapter documents are seeded, and everything is ready for you to write into. The Wizard isn't a prison — you can exit at any step and use the artifacts it created.
Step 10 — Chapter drafting
For each chapter you mark as ready, the Wizard drafts prose. It goes chapter by chapter, streaming paragraphs into a diff view.
The choice screen for each chapter has two options. Continue to the editor → takes you directly to /write on that chapter's seeded document — you write the prose yourself. Write for me streams a full drafted chapter, roughly 3,000–8,000 words depending on chapter length, in the voice you set at Q3, referencing the Lore Book entries you populated.
Write for me burns roughly 50,000 tokens per chapter. If you have less than that in your rolling 7-day budget, an orange warning bar appears at the top of the choice screen with an Upgrade link. See Tokens for how the budget works.
When the draft finishes streaming, the diff view opens. Every paragraph the AI drafted appears in its own row with three buttons:
- Accept — the paragraph enters your manuscript at its exact position and is logged to Provenance with the exact before/after text.
- Reject — the paragraph is discarded. It never enters the manuscript.
- Regenerate — the AI drafts a fresh version of that specific paragraph, keeping the neighbors unchanged.
You can also Regenerate with focus — regenerate the paragraph with an additional instruction ("more menace here", "cut the metaphor", "shorter sentences"). Or I'll edit in the editor — reject everything and open the seeded document blank to write from scratch.
Nothing enters your manuscript automatically. Every accepted paragraph is recorded as AI-authored in the Provenance ledger, so when a publisher asks "how much of chapter 3 did I actually write," the answer is there down to the paragraph, with the exact text and the timestamp.
When something goes wrong
- A step's "Saved just now" chip never fires. Autosave triggers 1.2 seconds after your last keystroke. If you're already deep-idle, tap any key to nudge it. If still nothing after 5 seconds, refresh — the page reloads with your last saved answer intact, so nothing is lost.
- Q10 drafting is running slowly. Chapter drafting streams paragraph by paragraph over 30–90 seconds per chapter depending on length. If a specific paragraph stalls for more than 20 seconds, cancel by hitting Escape and click Regenerate on that row. See Troubleshooting.
- The proposed cast doesn't match the synopsis I edited. The Wizard doesn't re-derive later steps automatically when you edit earlier answers (this is deliberate — reactive recomputes would burn tokens on drafts you might not want). Go back to Q5 and click the Regenerate button in the header to reseed characters from the updated synopsis.
- I ran out of tokens mid-Wizard. Your budget refills gradually on a rolling 7-day window. The Wizard saves your position — come back tomorrow and click Continue at [step name] → on the landing card. See Tokens.
- I want to redo just one step, not the whole Wizard. Navigate to
/wizard/<step number>directly in your address bar, or use the step counter at the top of any Wizard page. Each step reads the current project state — you can re-run in isolation.
How to use it
- Click Wizard in the left sidebar (or navigate to
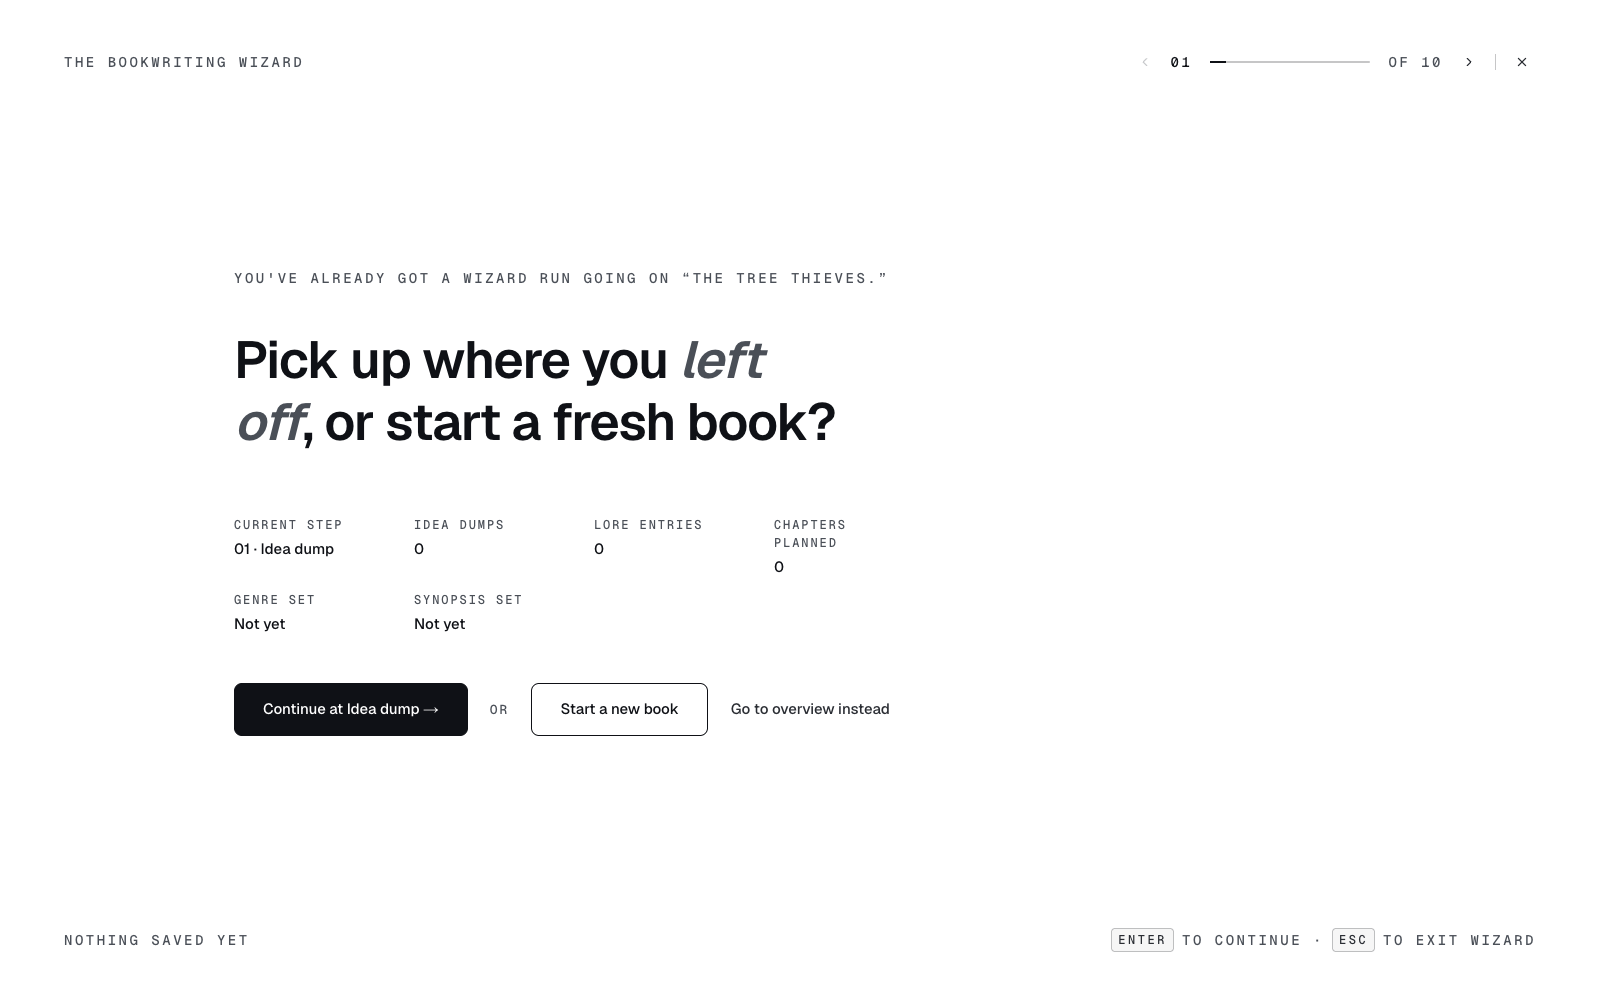
/wizard). On a fresh project the Wizard auto-starts and drops you on Q1. On a project with an in-progress run, you see a landing card showing "Current step", "Idea dumps", "Lore entries", and "Chapters planned" — click Continue at [step name] → to resume from where you left off, or Start a new book to create a fresh project. - On Q1 — Idea dump, paste anything you have into the underlined textarea. Autosave fires 1.2 seconds after your last keystroke; the footer reads "Saved just now" when it flushes. Click Yes, I do → to advance. If you have nothing, click No, I don't — help me brainstorm to open the mini brainstorm chat, or Skip for now if you want to hop past (not recommended).
- Work through Q2 (Title), Q3 (Genre + style), and Q4 (Synopsis) the same way. Every step has two primary paths — Yes, I do → to keep what you typed, or a No, I don't — button to have the AI propose options for you. Proposals stream in over 5–15 seconds; you can watch them write.
- In Q5–Q7, seed characters, locations, and objects. The Wizard shows cards you can accept, edit inline (click the pencil), or delete. Add your own via the Add another dashed tile at the bottom of each list. Every card autosaves 700ms after your last edit; a small "Saved" chip appears at the bottom of the card.
- In Q8 — Outline, edit the proposed chapter list. Drag rows to reorder, click a title to rename, click a premise to expand and edit, use the trash icon to delete, or Add row to insert your own. Click Save & continue → to write to
/outlineand advance to/wizard/chapters. - On
/wizard/chapters(steps 9 and 10), the header shows "Chapter N of M" and a progress bar. For each chapter, type beats one per line into the textarea (autosaved 1.2s after your last keystroke) or click Plan it for me to have the AI stream 5 plan options. Pick a plan card to prefill the textarea, edit it, then click Save plan & continue →. - On the choice screen for each chapter, pick Continue to the editor → to write the chapter yourself (a document is seeded and you jump to
/writeon it), or Write for me to stream ~50k tokens of drafted prose. If you're under 50k tokens remaining, an orange warning bar appears with an Upgrade link. - When the draft finishes streaming, it auto-saves to your book (chip reads "Saved to your book") and the diff view opens. Accept individual paragraphs, or click Regenerate / Regenerate with focus / I'll edit in the editor. Every accepted paragraph is logged to Provenance with the exact before/after text.
What to read next
- Write — the editor, once your chapters are seeded
- Voice fingerprint — before running Q10, generate a voice fingerprint from your existing prose so the drafted paragraphs sound like you, not like generic AI
- Provenance — where every accepted AI paragraph is logged, and how to export the audit trail