The three story-graph views
Your book's structure lives in three connected views on the /lore surface: Overview (book meta), Lore Book (typed entity entries), and Outline (Acts → Chapters → Scenes tree). All three are seeded by The Wizard, but the whole page is a live editor — you can add to any view, edit any entry, and rearrange the outline at any point in your writing process.
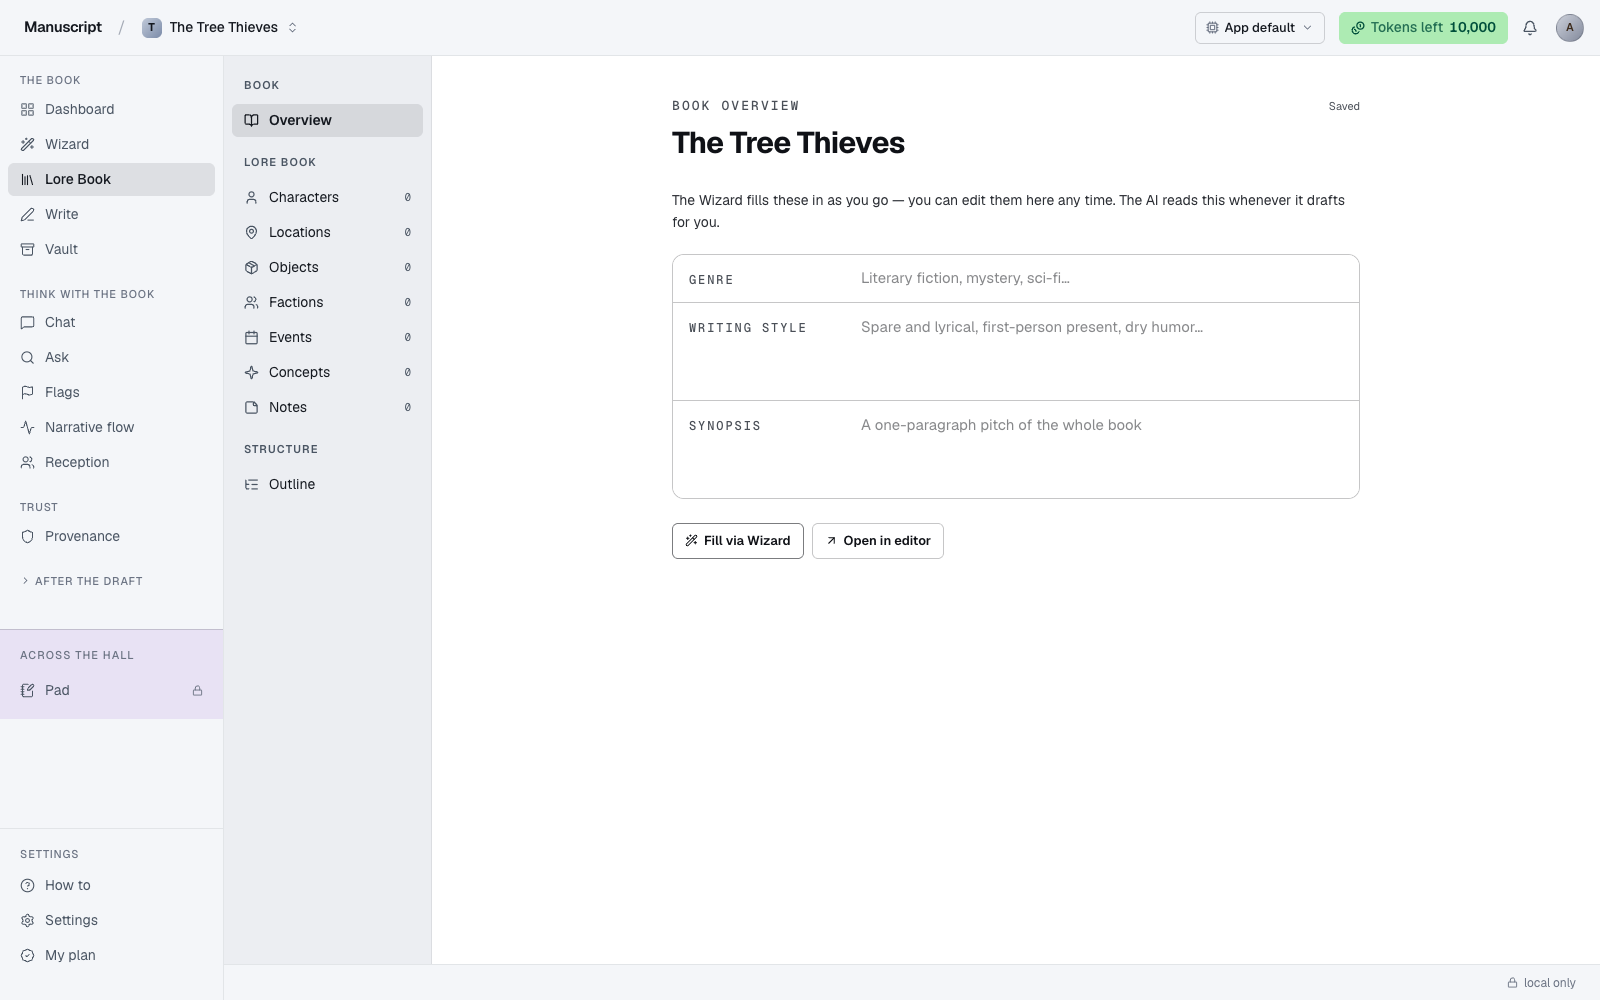
When you land on /lore, a left-side navigator (200px wide at desktop widths, a horizontal pill row on mobile) groups these three sections: Book → Overview, Lore book → seven kind entries with live counts, Structure → Outline. The main content pane switches based on what you pick, and the whole surface uses the wizard palette — ink-strong text, visible rules, uppercase mono labels — so it reads as a proper book workspace rather than a low-contrast admin screen.
The three views are windows onto the same story graph. A character in the Lore Book might be referenced on a scene node in the Outline. The synopsis on Overview references locations and characters by name. Editing a Lore Book entry updates every place it's mentioned. Renaming a character in the Lore Book renames the @-mention chip everywhere it appears in the editor, and aliases still resolve to the new name.
Overview
Overview holds the meta about your book: title, genre, writing style, and synopsis. These are the same fields you filled in during Wizard steps 2–4 — editing here updates the seed the AI leans on for every subsequent drafting proposal. The layout is a Notion-style property table: a big editable title at the top, then a rounded card underneath with three rows (Genre, Writing style, Synopsis), each showing a mono uppercase label on the left and the value input on the right.
Change the title here and it updates on the dashboard card, the top-right title chip on every workspace surface, and the browser tab title. The old title isn't referenced anywhere in your prose — it was only a working label — so renaming is a cosmetic change with no drift risk.
Change the writing style here to shift the voice of every future AI suggestion. This is the same style line you set at Q3 of the Wizard, and it's quoted verbatim into the system prompt used by the editor's 12 inline AI commands, every template run, every Desk draft, and every chapter drafted in the Wizard. Existing prose is not rewritten — only future proposals reflect the change. If you've generated a voice fingerprint, that takes precedence over the style line for surfaces where voice is enabled.
Change the synopsis here to change what the AI considers your book's north star. It's not injected on every AI call (that would burn tokens), but it's the seed most Wizard steps read from, and it's what the Book-Aware Chat references when you use whole-book scope. Every edit auto-saves 700ms after your last keystroke; a small "Saving…" / "Saved" chip appears in the top-right of the pane.
At the bottom of Overview are two quick-jump buttons: Fill via Wizard re-opens the guided interview if you want to add or rework any of these fields with AI help, and Open in editor takes you straight to Write.
Lore Book
The Lore Book holds every named thing in your book, split across seven kinds. Each kind gets its own card grid in the main pane, with a count badge in the sidebar showing how many entries you have of that type.
- Character — anyone who acts. Protagonists, antagonists, walk-ons, off-page mentions.
- Location — anywhere the story happens. A house, a city, a starship, an interior room.
- Object — a thing that matters. A locked drawer, a compass, a letter, a knife.
- Faction — a group. A family, a church, a resistance cell, a corporation.
- Event — something that happened. A war, a wedding, a betrayal, a fire.
- Concept — an idea the book turns on. Grief. A political system. A rule of magic.
- Note — anything else you want to keep near the story graph.
Each kind has its own recommended fields — a Character has age, occupation, and a key trait; a Location has region, vibe, and key detail; an Object has description and symbolic weight. Fields are lightweight text inputs, not required. You don't have to fill every field. Fill what matters.
When you land on a kind's grid, the header shows the kind's plural label ("Characters", "Locations") in the ochre uppercase mono style, plus two buttons on the right: Draft with AI — the AI generates a fresh entry proposal based on your synopsis and existing entries — and New character (or New location, etc.) — creates a blank card seeded as "Untitled character" you can type over. If the grid is empty, you also see an atmospheric title ("No one lives here yet.", "No places mapped.", "No things kept.") and both buttons in the empty-state card, plus an optional import prompt if you've got existing lore in the legacy Manuscripts.ai backend.
Each card in the grid renders as a small book jacket: a portrait strip at the top (a gradient placeholder based on the entry name, or the generated image if you've used the Portrait feature), then the name in a big bold input, then the kind-specific fields stacked as label-plus-input rows underneath. An expand toggle at the bottom reveals aliases and a free-form Notes textarea for anything that doesn't fit the recommended fields. Save happens 700ms after your last keystroke; a "Saving…" / "Saved" chip in the card footer reports state. Remove is next to it as a quiet gray link that requires a two-click confirm (Remove → Cancel / Delete) so a stray click can't delete a character.
Aliases
Every entry has a name and an optional list of aliases — the other things the entry is called: nicknames, code names, epithets, aliases in-fiction. "The man in the hat" is an alias for Detective Vance. "The Kingfisher" is an alias for the same character when he's undercover. Aliases are added in the card's expandable "Also known as" section — type an alias, press Enter, it becomes a chip; click the × on a chip to remove it.
Aliases matter more than they look. The @-mention typeahead in the editor searches names AND aliases, so a character can be found under any name they use. The Codex auto-injection uses aliases to detect which entities are relevant to a paragraph even when the paragraph doesn't spell out the canonical name. Book-Aware Chat uses aliases the same way when it pulls context. Use them liberally — the cost is zero, the coverage improvement is real.
Portraits
Character, Location, and Object entries support portrait generation — a rendered image based on the entry's fields, generated on demand via the same image pipeline the Wizard uses. Click the small + Portrait button in the bottom-right of the card's portrait strip. The card must have a name first (the button disables and shows a "Name it first" tooltip if the name is empty), and a portrait takes 10–30 seconds to generate.
Portraits are for your reference only. They never appear in the manuscript, never appear in exports, never get shipped anywhere. Their purpose is to give you a visual anchor while writing — some authors find that pinning a generated face to a character makes them harder to accidentally rewrite mid-book. If you don't want portraits, ignore the button; nothing depends on them.
Faction, Event, Concept, and Note entries don't get portraits because the image model wasn't tuned for those kinds — the results would look generic. The button simply isn't rendered for those kinds.
@-mentions in the editor
In Write, type @ anywhere in your prose and the typeahead surfaces every Lore Book entry that matches what you're typing. It searches names and aliases across all seven kinds, ranked by how well they match. Pick one to insert a mention chip into your paragraph — a small styled inline span with the entry's name and a link back to its Lore Book card.
At the bottom of the typeahead list is a Create on the fly option — make a new lore entry (of whichever kind you pick) without leaving the editor. The card is added to the Lore Book immediately and the chip is inserted into your prose.
Mentions are load-bearing. When you run an inline AI command on a paragraph that contains one or more mentions, the referenced entries' full fields are automatically injected as context in the system prompt. That's what "Codex auto-injection" means: the AI sees the character's occupation and wound before it rewrites your sentence about them. The suggestion sheet header shows how many lore entries were pulled in — "+ 3 from lore" beside the task name — so you can verify the injection happened.
Outline
The Outline is your book's structure, three levels deep: Acts → Chapters → Scenes. It's rendered as a tree — a rounded card with a border, each row an indented item with an expand caret on the left for parents that have children or scene beats. Most books have three acts, but nothing enforces that; you can have one act with twenty chapters, or seven acts with three chapters each.
Each row shows a small kind chip on the left (Act / Chapter / Scene, color-coded — info blue, warning ochre, subtle gray respectively), the node's title next to it, a status chip on the right (Planned / Drafting / Revising / Done, each with its own color), and — if set — a word count in mono type ("1,247/3,000 words"). Below the title, an optional summary line describes the beat in one sentence.
Scenes and Chapters get an extra affordance: a Go to chapter or Go to scene button appears on hover at the right of the row. Clicking it opens the linked document in Write. For chapters with no linked document yet, the button lazy-creates one — it seeds a document with the outline structure (headings for every chapter, beats as bullets) and navigates to it. So a fresh Wizard-generated outline lets you jump straight into any chapter's document with one click, and the document exists before you write into it.
Scene nodes optionally have a word target — an integer goal for that scene. The word count that appears on the row is word_actual / word_target when the target is set, or just word_actual when it isn't. This is purely informational; nothing prevents you from writing more or less than the target.
The tree is read-only on this page — for full drag-and-drop reordering, add-child actions, and status editing, click Full editor in the top-right of the Outline pane to open /outline. This surface is optimized for scanning and jumping; the standalone /outline page is optimized for structural editing.
How Overview, Lore Book, and Outline work together
You'll notice the same entities appear across all three views. A character in the Lore Book might be listed on a scene node in the Outline. The synopsis on Overview references locations and characters by name. That's intentional — the three views are windows onto the same story graph.
Editing a Lore Book entry updates every place it's mentioned. Renaming a character in the Lore Book renames the mention chip everywhere it appears in the editor. Aliases still resolve to the new name — so if you rename "Kingfisher" to "Vance" but keep "the man in the hat" as an alias, both continue to work.
The graph is what makes AI proposals feel like they know your book. When the editor's inline Rewrite runs on a paragraph that mentions three characters, the AI reads those three characters' full Lore Book entries before rewriting. When Book-Aware Chat answers "does Ada know about the letter yet?", it pulls the letter's Object entry, the Ada character entry, and any Outline scenes that reference either. The more you fill in here, the more grounded every AI output becomes — and the less generic-AI mush leaks into your book.
How to use it
- Click Lore Book in the left sidebar (labelled
L). The page opens with a left-side navigator split into three sections: Book (Overview), Lore book (Characters, Locations, Objects, Factions, Events, Concepts, Notes), and Structure (Outline). Overview is selected by default. - To create a lore entry, click a kind in the sidebar - e.g. Characters. The right pane switches to the card grid for that kind. If empty, you see the atmospheric title ("No one lives here yet.") and two buttons.
- Click New character (top-right, or the same button in the empty state) to create a blank card seeded as "Untitled character". Or click Draft with AI to have the AI propose a full entry - wait 5-15 seconds while it generates. Both add a card to the grid.
- On any card, type into the Name input (bold, top of the card). Fill in the kind-specific fields underneath - for a Character, that's fields like age, occupation, key trait. Every keystroke debounces 700ms; the footer reads "Saved" (or "Saving..." briefly). Click More to reveal Also known as (aliases) and Notes.
- To generate a portrait (Characters, Locations, and Objects only), click the small Portrait button in the bottom-right of the card's portrait strip. The card must have a name first. Wait 10-30 seconds while the image generates; it saves immediately (no debounce).
- To add an alias, click More to expand the card, then type into the Add alias (Enter) input under "Also known as" and press Enter. Aliases resolve to the same entry when you
@-mention them in the editor. - To reference the entry in your manuscript, open Write, type
@, and start typing the name (or any alias). Pick the entry from the typeahead to insert a mention chip. Any AI command you run on a paragraph containing mentions auto-injects the full lore entry as context. - To delete an entry, click Remove in the card footer, then Delete in the confirm row that appears.
What to read next
- Write — using
@-mentions and Codex injection while you draft - The Wizard — the initial seeding pass for all three views
- Voice fingerprint — how the AI decides whose voice to write in, once the graph is built